
Blog
Epoxy Tumblers Explained: A Step-by-Step for Durable, Glossy Finishes
Unlock Your Creativity: The Ultimate Guide to Epoxy Tumblers
Ever admired those stunning, glossy tumblers you see everywhere? You’re in the right place! This guide will show you exactly how to epoxy a tumbler, transforming a simple cup into a personalized work of art. It’s a fantastic way to unleash your creativity, make unique gifts, or even start a small business.
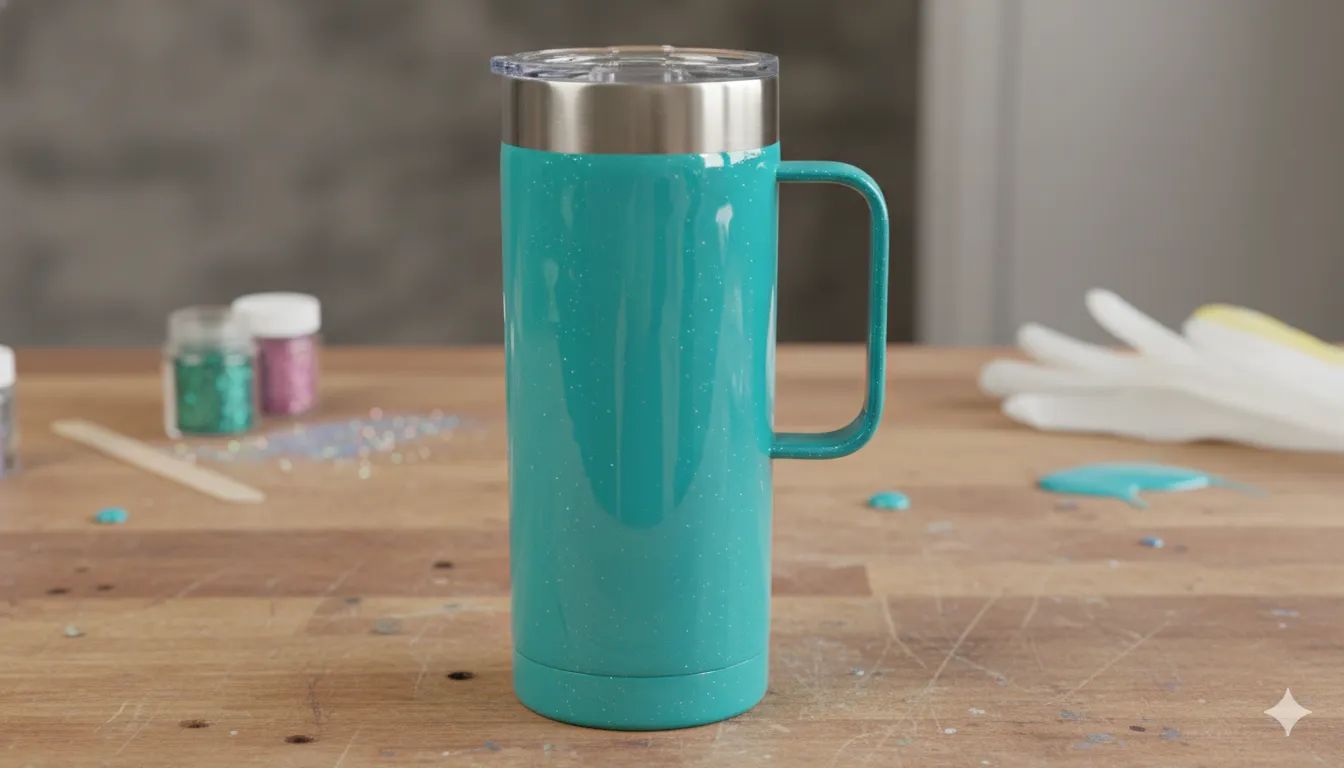
Epoxy tumblers aren’t just pretty; they offer incredible durability and a beautiful, high-gloss finish that makes any design pop. We’ll take a plain stainless steel tumbler and give it a professional, lasting shine using a special protective coating. Mastering how to epoxy a tumbler means creating something truly special!
Whether you’re adding vibrant designs, intricate decals, or creating dazzling glitter tumblers, the key is a two-part epoxy resin. This resin forms that smooth, hard, protective shell. It might sound complex, but we’ll break down the entire process step-by-step for a flawless finish.
This journey from a blank canvas to a gleaming masterpiece is incredibly rewarding. You’ll master applying perfect layers, ensuring a smooth surface, and understanding crucial details like curing time. Get ready to dive into the world of craft epoxy and create tumblers you’ll be proud of for years!
Essential Gear: Gathering Your Tools & Materials for Epoxy Tumbler Success
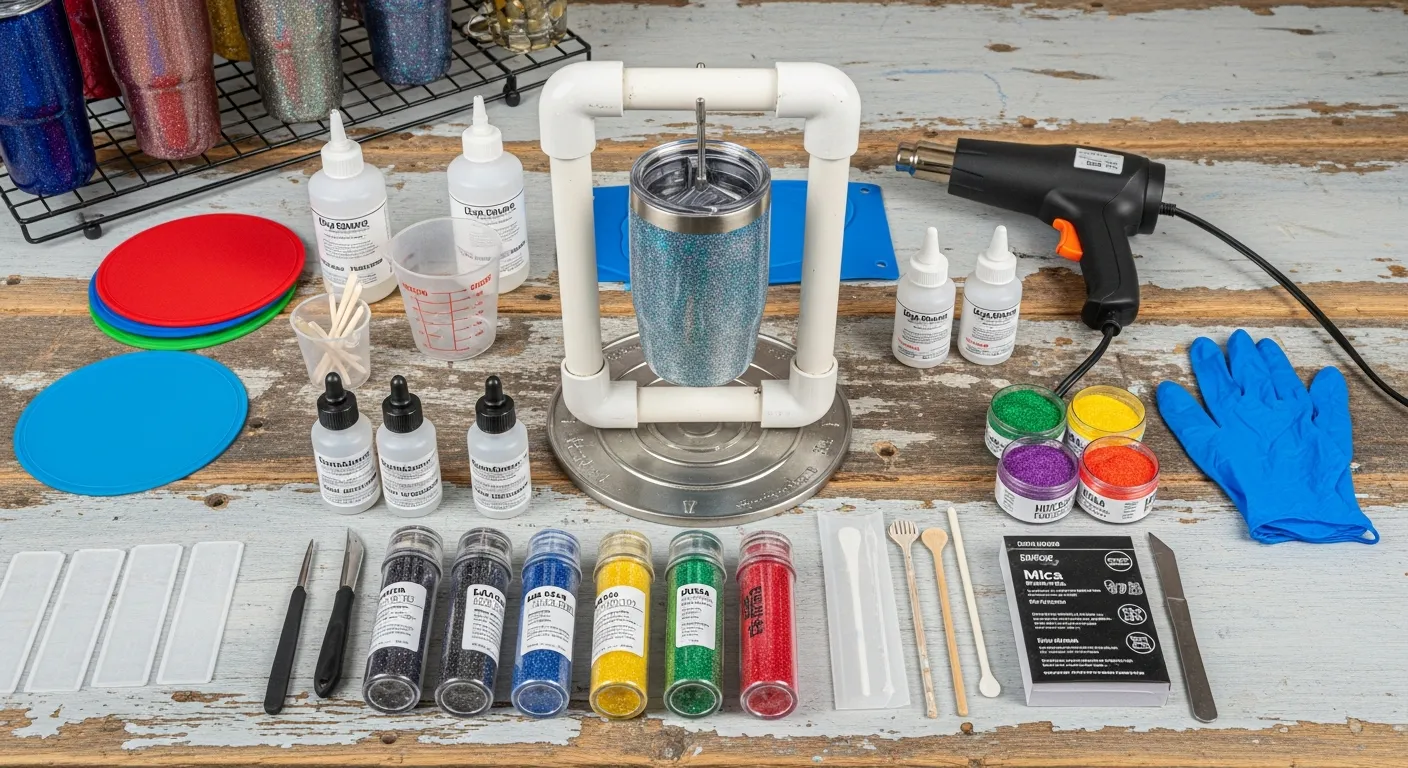
Ready to jump into creating some amazing tumblers? Before you learn how to epoxy a tumbler, you’ll need to gather a few essential items. Having the right gear makes the whole process smoother, safer, and ensures you get that gorgeous, lasting finish.
Don’t worry, most of these things are easy to find. Think of it as setting up your little craft station for ultimate success in learning how to epoxy a tumbler!
- Tumblers: Of course! A plain stainless steel tumbler is a great starting point.
- Epoxy Resin: This is the star of the show. You’ll need a two-part, clear craft epoxy specifically designed for coatings.
- Measuring & Mixing Supplies: Disposable measuring cups (silicone works too!), stir sticks, and an accurate scale are crucial for proper mixing of your epoxy resin.
- Gloves & Respirator: Safety first! Protect your hands and lungs when working with resin.
- Tumbler Turner: Absolutely essential for an even coat and perfect curing time. This device slowly rotates your tumbler.
- Heat Gun or Torch: For popping those pesky air bubbles out of the resin.
- Painters Tape: To protect the rim and bottom of your tumbler.
- Glitter/Decals: If you’re planning on dazzling glitter tumblers or adding designs.
- Rubbing Alcohol: Great for cleaning your tumbler before you start.
- Protective Surface: Cover your workspace with a silicone mat or wax paper.
The 7-Step Process: How to Epoxy a Tumbler for a Flawless Finish
Ready to dive in and learn how to epoxy a tumbler? This step-by-step guide will walk you through creating that beautiful, durable finish. Just remember, patience and precision are your best friends here!
- Prep Your Tumbler: First things first, clean your stainless steel tumbler thoroughly with rubbing alcohol and let it dry. Then, use painter’s tape to meticulously cover the rim and the very bottom. This protects the areas you don’t want resin on.
- Mix Your Epoxy Resin: This is crucial! Carefully measure equal parts of your A and B components of the epoxy resin using your scale. Stir slowly for 3-5 minutes, scraping the sides and bottom, until there are no streaks and the mixture is clear. Proper mixing ensures a perfect curing time.
- Apply the First Thin Coat: Place your prepped tumbler onto the turner. Using a gloved finger or a brush, apply a very thin, even layer of craft epoxy over the entire surface. If you’re making dazzling glitter tumblers, sprinkle your glitter evenly while this coat is still wet.
- Pop Bubbles & Partial Cure: Gently pass your heat gun or torch over the wet epoxy to release any tiny air bubbles. Let the tumbler continue to spin on the turner for 4-6 hours, or until the epoxy is tacky but no longer wet.
- Add Decals & Second Coat: If you’re adding vinyl decals, apply them now, pressing firmly. Once your decals are down, mix another batch of epoxy resin. Apply a second, slightly thicker coat over the entire tumbler, ensuring it covers any glitter or decals smoothly.
- Pop Bubles & Full Cure: Repeat the heat gun step to remove any new bubbles. Let your tumbler spin on the turner for a full 8-12 hours for the initial hard cure. This ensures a smooth, even finish and proper hardening.
- Final Cure & Admire: Once it stops spinning, carefully remove your tumbler from the turner. Allow it to sit undisturbed for a full 72 hours to achieve maximum hardness and durability. Now you have a stunning, professional-looking tumbler!
Beyond the Basics: Expert Tips for Preventing Common Epoxy Problems

You’ve learned how to epoxy a tumbler‘s core steps. Now, let’s refine your craft! Avoid common pitfalls with these expert tips for a truly flawless finish:
- Warm Environment: Keep your workspace and epoxy resin at 70-75°F. Cold epoxy causes bubbles and a thick application, especially noticeable on glitter tumblers.
- Precise Mixing: Stir craft epoxy slowly for 3-5 minutes, scraping sides/bottom. Incomplete mixing leads to tacky spots and poor curing time.
- Clean Surface: Always wipe your stainless steel tumbler with isopropyl alcohol. This removes oils/debris, preventing “fish eyes” or uneven finishes.
- Full Cure Time: Never rush curing time. A full 72 hours ensures maximum hardness/durability. Impatience yields a softer, less protective finish.
- Dust Prevention: Work in the cleanest area possible. Dust particles readily embed in wet epoxy, marring your tumbler’s glossy surface.
Master these tips for consistently stunning results every time you epoxy a tumbler!
Crafting Safely: Important Precautions for Working with Epoxy Resin
So, you’re mastering how to epoxy a tumbler – that’s fantastic! But before the fun really begins, let’s talk critical safety. Working with epoxy resin means taking a few simple, but essential, precautions.
These aren’t optional; they protect you and your workspace. Think of it as part of your crafting ritual!
Here’s how to stay safe:
- Ventilation: Always work in a well-ventilated space. Open windows or use a fan to keep fresh air circulating and disperse fumes.
- Skin Protection: Wear nitrile gloves. Craft epoxy can irritate skin. If contact happens, wash immediately with soap and water.
- Eye Protection: Safety glasses are non-negotiable! They shield your eyes from any unexpected splashes, especially when handling a stainless steel tumbler on a turner.
- Surface Protection: Cover your work area with wax paper or a silicone mat. This makes clean-up easy and prevents sticky messes on your precious surfaces.
- Proper Disposal: Never pour uncured epoxy down the drain. Let any excess resin cure in a disposable container, then simply throw it in the trash.
Follow these easy safety steps for a worry-free experience, creating beautiful glitter tumblers with perfect curing time.
Caring for Your Masterpiece: Keeping Your Epoxy Tumbler Beautiful for Years
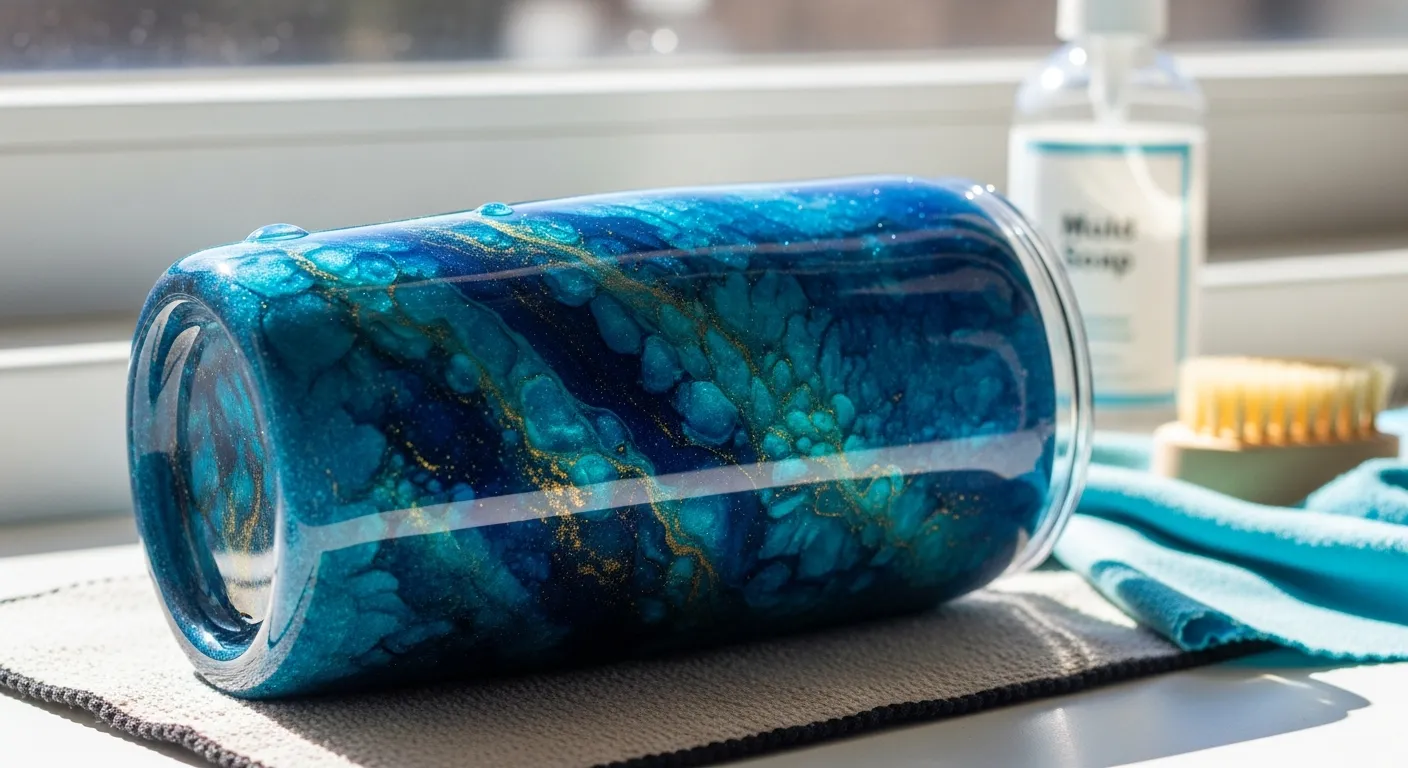
You’ve mastered how to epoxy a tumbler and created something truly unique! To keep that glossy finish perfect for ages, a little care is key. Your beautiful creation deserves it!
Epoxy tumblers are tough, but not indestructible. Here are simple steps to ensure your masterpiece stays stunning:
- Hand Wash Only: This is non-negotiable! Never put your epoxy resin tumbler in the dishwasher. The intense heat will damage the finish, making it cloudy or even peel.
- Gentle Cleaning: Use warm, soapy water and a soft cloth or sponge. Steer clear of abrasive scrubbers or harsh chemical cleaners, which can scratch or dull your design.
- No Soaking: Avoid prolonged soaking. While the craft epoxy is sealed, constant submersion, especially in hot water, isn’t good for its long-term integrity.
- Avoid Extreme Heat: Keep your stainless steel tumbler out of hot cars and away from direct heat sources. High temperatures can compromise the epoxy’s bond and clarity, even after a thorough curing time.
- Handle with Care: Though durable, dropping your tumbler can cause dings or cracks in the epoxy layer.
Follow these easy tips, and your personalized glitter tumblers will continue to shine, reminding you of your awesome crafting skills for years.
Frequently Asked Questions
How long does epoxy really take to fully cure, and when can I start using my gorgeous new tumbler?
Ah, the age-old question! While your tumbler might feel “dry to the touch” within 12-24 hours, that doesn’t mean it’s fully cured and ready for heavy use. Most epoxy resins require a full 72 hours (3 days) to reach their maximum hardness and chemical resistance. For the best results and the most durable finish, we highly recommend letting your tumbler cure for the full 72 hours before using or washing it. Patience is truly a virtue here – it ensures your finish lasts a lifetime!
Uh oh, I have bubbles in my epoxy! What’s the best way to prevent them, or fix them if they appear?
Bubbles are a common foe, but totally conquerable! The best defense is a good offense: mix your epoxy slowly and thoroughly to avoid incorporating too much air, and ensure your resin is slightly warm for better flow. If bubbles still pop up after application, a quick pass with a heat gun or a small butane torch (keeping it moving!) is your best friend. The heat thins the epoxy, allowing the bubbles to rise and pop. Just don’t overheat it, or you might scorch your beautiful work!
Is it safe to drink from an epoxy-coated tumbler? What about food safety?
Absolutely! Once epoxy is fully cured, it becomes an inert plastic. Most art-grade epoxies are considered food-safe for incidental contact – meaning they’re perfectly fine on the exterior of your tumbler where your hands touch it and for general durability. However, it’s crucial to avoid coating the very rim or, even worse, the inside of the tumbler with epoxy unless the specific product you’re using is certified as “food-grade” for direct contact. Always check the manufacturer’s specifications on your chosen epoxy to ensure it meets your safety standards for food and drink.
Can I add more layers of epoxy or even change the design later on if I want to refresh my tumbler?
Definitely! That’s one of the beauties of working with epoxy. You can absolutely add more layers – perhaps to embed more glitter, add a new decal, or simply build up a thicker, more durable finish. Just make sure the previous layer is fully cured before adding a new one. If you’re applying a new design over an old, fully cured epoxy, a light sanding with fine-grit sandpaper (like 220-grit) can help create a mechanical bond for the new layer to adhere to. It’s like giving your tumbler a fresh canvas!